
How to Make a Flower Bed
"Make your bed" is one of those statements that we each must have heard a million times as kids. As gardeners though, this simple phrase has a different meaning. "Make your bed" is all about preparing the soil for planting your flower bed. Every gardener gets excited by the thought of finally getting their hands in the soil. The joy of finally getting to see the flower garden ideas come together in spring is certainly a rewarding experience. However, the key to success starts before the first plant even sees the garden.
The roots of a plant are the foundation on which that plant thrives. Good roots will generally mean that you have a happy, healthy plant that can survive the rigors of spring and summer. A poor root system means your plants cannot grow to their full potential and leaves them vulnerable to damage from insects and disease. The most important factor for good roots is good soil preparation.
If you are a beginning gardener, properly preparing your soil can be daunting. However, there are some easy steps that you can take to get your garden bed soil ready to be planted.
There are three basic types of flower beds you might be preparing (click to jump to that section):
- A brand new bed that has never been planted before.
- An empty bed that has been planted before.
- A planted bed with existing perennials, bulbs, and/or shrubs.
HOW TO START A FLOWER BED
The first step when planning to add a new flower bed or even if you are simply planting a tree or shrub is to check if there are any buried utility lines on your property. Most areas should have a number you can call to check locations for these lines. Check with your local government for the correct number to call. In addition to public utility lines, you will want to make sure you have identified any irrigation lines that might be buried on your property.
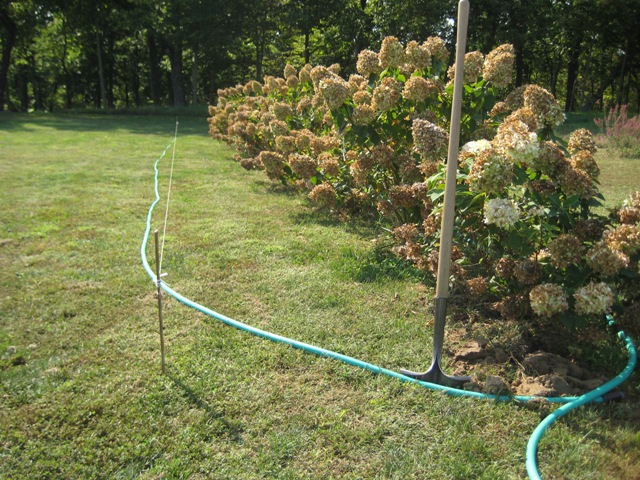
Define the outline of your flower bed
The best way to begin to prep this type of garden bed soil is to define the outline of the bed in the fall. It can sometimes be helpful to use a garden hose to determine the outline of the bed. A garden hose can be moved and reshaped until you find exactly the right shape and size for your bed.
Remove existing vegetation
When preparing a brand new garden bed you will need to kill the existing vegetation. If this is woody material, you will need pruners or perhaps even a saw. If the existing weeds are herbaceous plants, things like grass and chickweed, you will have an easier time.
- Cover the soil and plant material with several layers of newspaper (a good 5 to 6 sheets should be sufficient) and then cover the newspaper with a good thick layer of compost, 2 to 3 inches would be great. Do not use the slick, full color adds. The ink in regular newspaper is not harmful to your soil, but the ink in the full color, slick papered ads can be problematic.
- Leave the bed alone until spring. Over the fall and winter the newspapers will block out all light, which will kill the vegetation. The newspapers will also decompose over several months and come spring you will have a nice layer of compost that you can turn over into the soil. This method is completely organic and will help improve your soil while killing existing vegetation.
- If it is already spring and you want to plant your bed soon, you can use an herbicide to kill the existing vegetation. Be sure to read the label for instructions on how and when to apply the chemical. Some herbicides can remain active in the soil for a period of time after application, be sure to take this into consideration when planning your bed prep. It is also possible to skip killing the foliage and simply move on to the next step, digging.

Turn the soil over
Once the existing vegetation is dead use a tiller, spade/shovel or garden fork to turn the bed soil over. With a brand new bed soil it may be difficult to get your tiller to break into the soil so turning the garden bed soil over first with a spade or shovel may be best.
When working the soil, you want the soil to be damp, but not wet. If the soil is too wet it will clump when you turn it over. If the soil is too dry it will be very difficult to dig and harmful to the soil. If you turn over a spade full of soil, it should break apart and look moist without sticking to your tools or dripping water.
A tiller will often turn the soil to a depth of 6 to 8 inches. It is good to get down at least 12 inches (the depth of a spade or shovel) when turning over a garden bed soil, another point in favor of the shovel. If you are really motivated, turning over the soil to a depth of 18 inches is even better, although it is a lot of work. This is often called double digging.
Mix compost into the garden bed
Once you have turned over the soil, spread a layer of organic matter or compost 2 to 3 inches thick over the bed and then turn the soil over again to mix the compost into the soil. Adding compost will improve the soil by adding nutrition and improving soil structure.
Avoid extremely fine compost or bagged amendments with a sand-like consistency as they tend to break down too quickly. You want something that has both large (1") chunks as well as smaller particles. Use material from your compost pile if you have one, or check with your local garden center. Then rake the surface of the soil to level the soil.

Control weeds
Turning over the soil will expose weed seeds that were previously buried to light, causing germination. You can control the germination of these seeds by applying a thick mulch like pine needles or bark products over the garden bed soil or you can treat your bed with a weed-and-feed product to help deter germination. If you do treat with weed and feed, be sure to read the directions and apply correctly. Some weed and feed products can damage roots below the soil if applied incorrectly.
Also, do not directly sow flower or vegetable seeds into the soil when using a weed and feed product as they will not germinate. Weed and feed products kill all germinating seeds, not just the weed seeds. If you use a weed and feed product, you will want to install plants already growing in pots or packs to fill your garden bed soil the first spring. By fall the chemicals should have broken down and you will be able to direct seed, if you want.
You can also wait until the weeds come up and simply pull them. This can be more time consuming than chemical applications, but it is organic in addition to being good exercise.
Irrigation, planting and mulch
Before planting, install an automatic irrigation system. Drip tubing is great for flower beds since it delivers water right to the roots of the plants. Plus you won't have to drag a hose around to water by hand. Check out our WaterWise Drip Irrigation system.
After you plant the bed you may still want to add a layer of compost to the top of the soil. A layer of mulch or compost on the top of the soil will help keep weeds from growing, makes for a neater look overall and will also help maintain moisture in the soil.
General Rules for Brand New Garden Beds:
- Work the soil when it is moist, but not wet.
- Turn the soil over to a depth of at least 12 inches.
- Add 2-3 inches of compost and turn it into the bed.
- Either cover the bed soil with a thick (3-4") layer of mulch or use a weed and feed to help keep weed seeds from germinating.
- Top dress with another layer of compost to keep down weeds and preserve moisture.
PREPARING SOIL IN EXISTING BEDS

The second type of garden bed soil is an existing bed that has nothing in it. In other words, you are replanting the same area you used last year. With this type of bed, you can treat it similarly to the brand new bed, but it shouldn't be necessary to layer the newspapers to kill existing vegetation.
Add compost to the bed soil
In either fall or spring or in both seasons, put a 2 to 3 inch layer of compost on the bed and then turn the compost into the soil. The single best thing you can do for your soil is to consistently add organic material. This will enrich the soil and help you grow better plants.
Once again, you only want to work the soil when it is moist, not wet or dry. To check your soil moisture content pick up a handful of soil and squeeze it.
- If you squeeze out water the soil is too wet to work.
- If the soil stays in a ball in your hand and then breaks apart when tapped, it is perfect.
- If the soil is too dry to form a ball, it is too dry to work.
If you work soil when it is too wet, you will cause it to clump and become compacted. If you work soil when it is too dry, you harm the soil structure. Working soil when it is moist will help maintain good air porosity and soil structure.
Double dig to 12 inches
After you add the compost layer, you will want to turn the compost into the soil. As before, you can use a tiller, shovel or garden fork to do this. I prefer to use a shovel so I can get at least 12 inches deep. Double digging will again be optimum, but any incorporation of organic matter will be beneficial.
Apply a layer of mulch to the top of the soil
After turning this compost into the soil, you may want to put another layer on top of the soil to act as mulch. If you add organic matter in the fall, it isn't necessary to add more in the spring. However, if you have poor soil adding compost twice a year can help improve the soil much more quickly. Remember that this organic matter gets used up each year and needs to be replenished to keep plants performing their best.
General Rules for Existing Garden Beds that are Empty:
- Add 2-3 inches of compost and turn it into the bed.
- Work the soil when it is moist, but not wet.
- Turn the soil over to a depth of at least 12 inches.
- Top dress with another layer of compost to keep down weeds and preserve moisture.
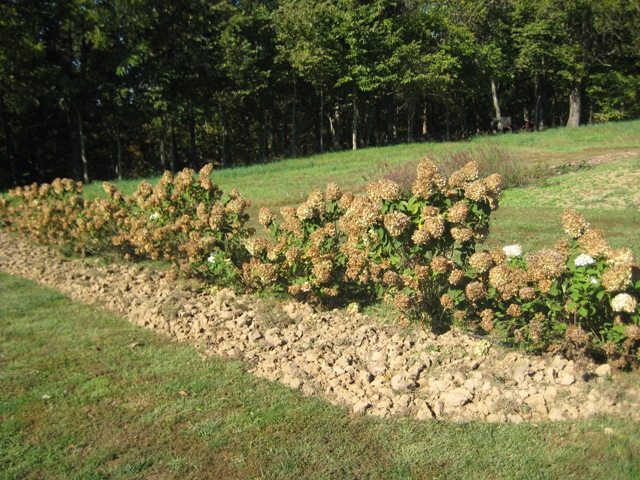
EXISTING BEDS WITH PLANTS
The third type of flower bed is one that already contains some perennials, bulbs and/or shrubs. These beds can be a bit trickier. You can't simply broadcast a thick layer of compost and then turn it under. You will need to be careful when working around the established plants that you don't harm their roots. You do still want to add organic matter. This can be done either in spring or fall, or in both spring and fall.
Incorporate compost around plants
Add a couple inches of compost around existing plants, work this into the top layer of soil a bit, if possible, but do not dig deep enough to harm the roots. Do not allow the compost to come into contact with the stems of the plants as this can promote disease. Even left mostly on top of the soil the compost will break down over time releasing valuable nutrients into the soil while preserving moisture and protecting the surface of the soil.
Established beds will often have open areas where plants have died or where annuals are added each spring. In these areas, go ahead and turn over the soil to incorporate the organic matter and then plant.
General Rules for Existing Planted Beds:
- Add 2-3 inches of compost and work it into the top layer of soil, if possible
- Work the soil when it is moist, but not wet.
- Do not allow compost to come into contact with plant stems.
- Top dress with another layer of compost to keep down weeds and preserve moisture.

CREATING THE BEST SOIL FOR FLOWER BEDS
Preparing the soil in your flower beds doesn't have to be difficult, although it is great exercise. Adding organic matter is the one thing that all soils can benefit from whether your soil is sand or clay based. The addition of organic matter is beneficial, even if you are blessed with loam soil. Are there more in-depth steps that can be taken? Sure. However, this is a good place to start. We have additional information on soil testing and amendments in another article.
You may also be asking where you can get compost or organic matter.
- You can make your own compost for your garden
- You can buy it from your local garden center
- Many municipalities have compost for sale or even for free. Check with your local government for programs in your area.
Cow and chicken manure are very high in nitrogen and can burn plants if used in their pure form. However, they make wonderful additions to the soil if you work them in well. They also act as a natural slow release fertilizer. Most of these manure products are highly composted so look for something organic to add along with them to get the best of both worlds. Peanut hulls, bark mulch (not bark nuggets, unless they are the 1/2" size) or compost from your compost pile are all excellent options.
When I moved to my new house my Dad (he's a farmer) came over and plowed a space for a vegetable garden. My soil is clay, but not really heavy clay. Over two years, I added compost three times and my soil has visibly improved. Now that the vegetable garden is in decent shape, I am concentrating on adding more compost to the flower beds around the porch. The soil there is more clay backfill, generously littered with rocks. I think it will take me longer to improve this soil. I have one thick layer of compost already incorporated and will add another thick layer this spring.